
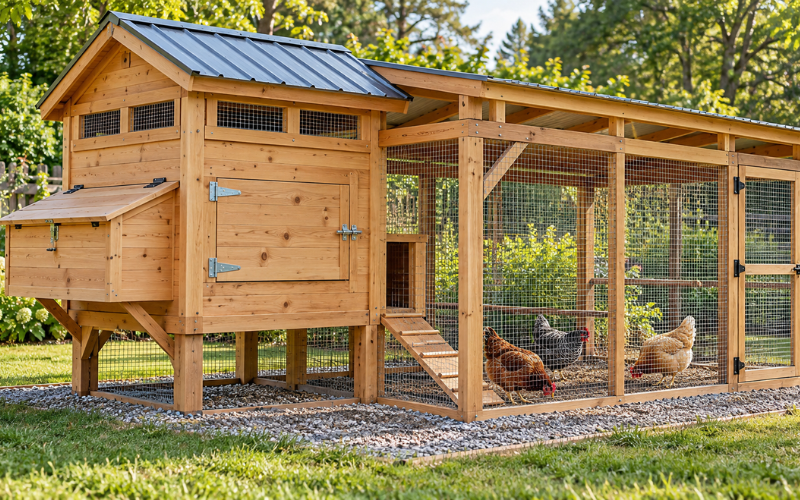
A DIY hen house is a homemade shelter where hens can sleep, lay eggs, and stay protected from weather and predators. Building your own gives you control over its size, layout, materials, and access. The most useful design is one that keeps your birds comfortable while making everyday care manageable.
The enclosed hen house and the outdoor run serve different purposes. The house provides a sheltered resting and nesting space. The run is a fenced outdoor area where hens can walk, scratch, and explore. Both need careful planning, especially when your flock cannot roam freely.
A successful DIY hen house design starts with practical decisions: how many hens you will keep, how much space you have, your local climate, and what you can reasonably build. Think about cleaning access from the beginning. A coop that looks attractive but is difficult to maintain can quickly become frustrating.
Start With Your Flock, Backyard Space, and Building Budget
Plan for the flock you expect to keep, rather than the number of chicks you currently own. Young birds grow quickly, and adding hens later can leave a small house overcrowded. If expansion is likely, allow extra space or choose a layout that can be extended without rebuilding everything.
Measure the entire available area, including the run and the space needed to open doors. Leave yourself a clear route for carrying feed, removing bedding, and moving a wheelbarrow. Check local rules before settling on a location, including any requirements for property boundaries, flock numbers, or building permission.
Build your budget around the complete structure. Timber and wall panels are only part of the cost; roofing, protective mesh, hinges, latches, screws, and weather protection also matter. Include tools you need to buy or borrow. A simple rectangular house is usually easier for a beginner to measure, frame, and finish than a design with several roof sections.
Choose a Hen House Style That Fits Your Space
A raised hen house can suit a compact backyard. An elevated floor helps separate the enclosed shelter from damp ground, and the area underneath may provide covered outdoor space. However, the support frame must be stable, and every part of the interior must remain reachable through access doors.
A walk-in house makes cleaning and inspection easier because you can stand inside. It can also offer more flexibility for positioning equipment. Its larger walls and roof require more materials, but comfortable access may be worthwhile if you expect to maintain the coop for years.
Movable coops allow you to change the flock’s location, but weight and ground conditions limit their usefulness. A structure that moves easily on dry, level grass may become difficult after rain. It also needs secure protection at ground level wherever it stands.
An existing shed can provide a useful starting point. Inspect its roof, floor, framing, and ventilation before converting it. A dry storage shed still needs suitable airflow, nesting space, roosts, and predator protection to function as a hen house.
Work Out the Hen House Dimensions Before Drawing Your Plan
Space recommendations vary with bird size, climate, and outdoor access. University of Minnesota Extension recommends a minimum range of three to five square feet of indoor space per bird. Treat this as a starting point, with additional room where hens spend long periods inside.
For an illustrative four-hen layout, a house measuring four feet by six feet provides 24 square feet before allowing for fixtures. An attached six-foot-by-eight-foot run adds 48 square feet outdoors. This is a planning example, rather than a universal capacity rating. Large breeds, extended confinement, and equipment occupying the floor may call for more room.
Draw the nests, roosts, feeder, and waterer inside the outline before approving the dimensions. Check whether hens can move freely once everything is installed. For a walk-in design, provide comfortable standing height and a doorway wide enough for cleaning equipment. For a smaller raised house, make access panels large enough to reach the far wall without climbing inside.
Pick a Location With Good Drainage and Daily Access
Visit the proposed location after rain. Standing water, soft ground, or runoff from nearby roofs can turn an apparently suitable site into a damp enclosure. Choose a well-drained area and arrange the roof so that rainwater flows away from the entrance and run.
Consider how sunlight changes across the day. Morning sun may help dry the surroundings, while afternoon shade can be valuable in hot weather. Avoid relying on a deciduous tree for year-round protection without considering seasonal changes. Check nearby trees for unstable branches before building beneath them.
Prevailing winds also influence door and vent placement. The house should admit fresh air without directing strong wind across sleeping hens. Keep the coop accessible in poor weather, too. A short, firm path is more useful than a distant corner that becomes muddy whenever you need to collect eggs or carry water.
Arrange Nest Boxes, Roosts, and Feeding Areas
Place nest boxes in a quieter part of the house, away from busy entrances. University of Minnesota Extension suggests one nest box for every four to five birds. Size each box for your hens so they can enter, turn, and settle comfortably. An external collection hatch can make gathering eggs easier, provided it closes securely.
Roosts provide elevated sleeping space. Minnesota Extension gives a general starting height of at least 12 inches above the floor and approximately nine inches of roost length per chicken. Adjust the arrangement for bird size, mobility, and available landing space. Smooth wooden boards provide a practical resting surface.
Keep roosts above nest-box level where practical, and avoid placing nests directly beneath them. This helps keep droppings out of the nesting area. Feed and water should also sit outside the droppings zone.
Leave clear routes between the entrance, nests, and feeding area. A crowded arrangement can create bottlenecks even when the house appears large enough on paper.
Design Ventilation Without Exposing Roosts to Drafts
Ventilation allows moisture and stale air to leave the hen house. Closing every opening to retain warmth can cause problems, particularly when manure and wet bedding add moisture. Minnesota Extension identifies ventilation and manure management as important ways to control dampness and poor air quality.
Include protected openings high on the walls or near the roof, with a suitable route for replacement air. Position the roosts so birds are outside the direct path of cold wind. Cover ventilation openings with securely attached protective mesh, and use roof overhangs or suitable vent covers to limit rain entry.
Your climate should shape the design. Hot conditions may require larger shaded openings, while wet climates need particular attention to rain protection. Adjustable covers can help manage changing weather, but the house should retain ventilation.
Watch the finished coop for condensation, persistent damp bedding, or an ammonia smell. These signs call for a review of airflow, cleaning, and possible water leaks.
Build Predator Protection Into the Design
Predator protection depends on the whole enclosure, including small openings that are easy to overlook. Check windows, vents, corners, roof edges, and the connection between the house and run. A strong wall offers little protection if a collection hatch or door can be pulled open.
Use sturdy, small-opening welded mesh, commonly called hardware cloth, for vulnerable areas. Lightweight chicken wire should not be your only barrier against predators. Attach mesh firmly to the frame, preferably trapping its edges beneath screwed timber strips rather than relying on a few staples. University of Minnesota poultry guidance also warns that predators can tear through chicken wire.
Choose latches that resist lifting or sliding by animals, and secure all access points before nightfall. To address digging, University of New Hampshire Extension recommends burying mesh at least one foot deep around enclosure sides. Ground protection needs to remain continuous at gates and corners.
Select Materials for a Durable, Easy-to-Clean Hen House
Choose framing timber that is sound and straight enough to form secure joints. Wall panels should suit their exposure to weather, and roofing should follow the manufacturer’s requirements for support, slope, and fastening. Thin or damaged materials can cost more later through repairs.
Reclaimed materials can reduce spending, but inspect them carefully. Reject rotten boards, panels with unexplained chemical contamination, and timber containing hidden nails or sharp edges. Avoid using materials with unknown coatings where hens may peck them.
University of Maryland Extension recommends selecting housing materials that are easy to clean and disinfect. Smooth, accessible interior surfaces make this easier than rough corners and narrow gaps. If you apply a suitable coating, allow it to cure fully before introducing birds.
Save money through a straightforward shape and sensible use of standard sheet sizes. Put durability first when buying roofing, mesh, hinges, and latches. These parts directly affect whether the house remains dry and secure.
Plan the Roof, Floor, Doors, and Cleaning Access
A single-slope roof can simplify a small build, but its pitch must suit the chosen roofing material. Provide overhangs where practical and direct runoff away from doorways. Gutters may help where roof water would otherwise soak the run. Roof supports must also suit local wind and snow conditions.
The floor needs to support birds, bedding, and anyone entering the house. Protect vulnerable edges from moisture and avoid leaving gaps where bedding or pests can pass through. A removable board across a large cleaning doorway can help contain bedding while allowing easier removal.
Give hens an entrance suited to their size. If the floor is raised, provide a stable ramp with grip and a comfortable slope. It should remain usable in wet weather.
Imagine cleaning the finished interior before you build it. Can you reach beneath the roosts, remove dirty bedding, and inspect every corner? Removable roosts or accessible droppings trays can make these jobs easier.
Turn Your Sketch Into a Practical DIY Build Plan
Start with a top-down drawing showing the house, run, doors, nests, roosts, and equipment. Add side views for the roof, supports, vents, and ramp. Mark door-opening directions so you can spot conflicts before construction.
Write down the external dimensions and usable internal measurements. Timber thickness and fitted panels reduce interior space, so a nominal four-foot-wide structure may offer less room inside. Prepare a material list covering framing, panels, roof covering, mesh, fasteners, and hardware. Allow for cutting waste without buying excessive extras.
Plan a clear build sequence. Establish the base, assemble and brace the frame, then install the floor, walls, and roof. Fit doors and internal features before completing the run and checking every connection.
A practical DIY hen house design also leaves room for verification. Check that the frame is square, doors operate freely, and fixtures do not block movement. Arrange qualified help for electrical work or structural questions beyond your experience.
Common Hen House Design Mistakes to Catch Before Building
One common mistake is sizing the house around its outside appearance rather than its usable interior. Nest boxes, equipment, and awkward corners can reduce movement space. Check the layout with all fixtures drawn in, and allow extra room if the birds will regularly remain indoors.
Another problem is placing roosts without considering droppings or landing space. A perch above the waterer creates a cleaning issue, while a high roost in a cramped house may be difficult for heavy birds to use. Nest boxes also become less practical when positioned beyond comfortable reach.
Weather protection and airflow need to work together. A sealed house may stay dry from rain yet become damp inside. An exposed vent may admit fresh air but also channel wind toward the roost.
Finally, inspect everyday features. Decorative trim, narrow hatches, weak latches, and unreachable corners can make an attractive coop inconvenient or insecure. Simpler arrangements often make maintenance easier.
Conclusion
A good DIY hen house design brings together enough space, reliable shelter, fresh air, predator protection, and comfortable cleaning access. Its value comes from how well it supports your hens and fits your daily routine.
Before cutting materials, review the plan against your flock size, local weather, available ground, and building budget. Check door clearances, roof drainage, equipment placement, and every enclosure opening. Adjusting a drawing is much easier than changing a finished structure. With these decisions settled, you can build a hen house that is practical to use and easier to maintain.
FAQs
1. How much indoor space should I allow per hen?
University of Minnesota Extension recommends a minimum range of three to five square feet per bird. Use flock size, breed, outdoor access, and climate to decide whether more is needed. Hens that spend extended periods inside need additional usable room. Remember that fixtures can reduce the available floor area.
2. Is a raised hen house better than a ground-level design?
A raised house can separate the floor from damp ground and provide covered space beneath it. However, it needs stable supports, a suitable ramp, and generous cleaning access. A ground-level walk-in house may be easier to maintain. The better choice depends on drainage, available space, and how you will reach the interior.
3. Can I use an old shed as a hen house?
Yes, if it is structurally sound and can be adapted to meet the flock’s needs. Check for leaks, rotten timber, unsafe coatings, and gaps before conversion. Add ventilation, secure entrances, suitable roosts, and nest boxes. Measure the usable floor space after installing fixtures rather than judging capacity from the shed’s exterior dimensions.
4. What is the easiest DIY hen house design for a beginner?
A simple rectangular house with a straightforward roof is often the most manageable starting point. It reduces complicated cuts and makes material quantities easier to calculate. Choose a plan with clear measurements, large cleaning access, protected ventilation, and secure connections. Ease of construction should still allow enough room and protection for the hens.